You have walked a field after a heavy rain and spotted the first flush of waterhemp poking through the rows. You know that if you do not act fast, that weed will steal moisture and nutrients from your crop all season. But broadcasting a full field spray feels wasteful and expensive. There is a better way.
Autonomous weed mapping robots allow you to detect and map weeds in real time, then trigger spot spraying only where needed. This guide walks through the deployment process, from selecting sensors to interpreting weed maps. You will learn how to reduce herbicide use by up to 90 percent while keeping your fields clean and your input costs low.
How Autonomous Weed Mapping Robots Work
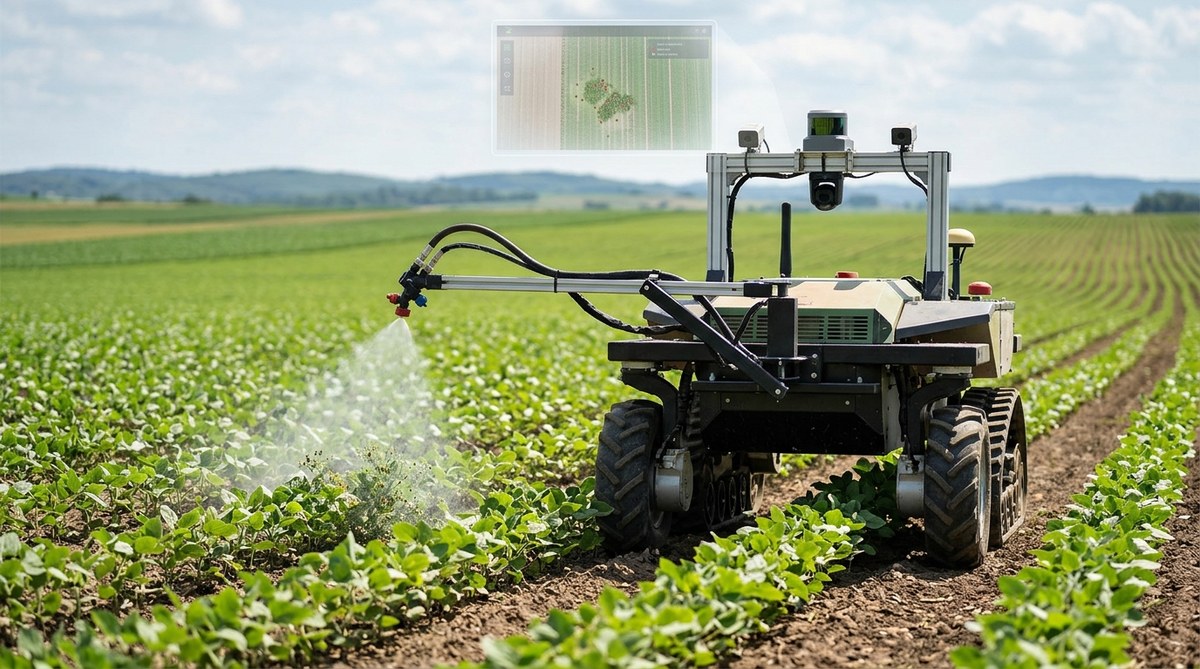
These robots combine three core technologies. First, they use cameras and sensors to scan the field. Second, onboard computer vision models identify weeds versus crops. Third, the robot either records the location of each weed or triggers a nozzle for spot spraying on the spot.
The robot moves through the field using GPS and RTK correction for sub-inch accuracy. As it drives, it captures images of the soil and plant material. A trained neural network classifies each pixel. Green vegetation that does not match the crop pattern gets flagged as a weed. The system then records that coordinate in a weed map.
Some robots carry a small tank and spray nozzle. When the vision system detects a weed, the robot stops and applies a precise dose. Other robots only map. You take that map back to the office, upload it to your sprayer, and apply herbicide only on the mapped zones.
Why You Should Consider Autonomous Weed Mapping
Herbicide resistance is a growing problem across the United States. Palmer amaranth, waterhemp, and horseweed are becoming harder to control with traditional broadcast sprays. By using autonomous weed mapping robots, you can apply multiple modes of action exactly where the weeds are. This slows resistance development.
There is also the cost angle. Herbicides are expensive. In 2026, the price of glyphosate and dicamba formulations remains high. Broadcasting over a whole field when only 10 percent of the area has weeds means you waste 90 percent of your chemical. Spot spraying with a robot cuts that waste.
And then there is labor. Finding skilled workers to walk fields and flag weeds is hard. Robots do not get tired. They can run at night. They do not complain about the heat.
A Step-by-Step Process for Deploying Robots in Your Fields
Here is a practical workflow that works for most row crops and specialty crops.
-
Choose the right robot for your crop and terrain. Not all robots are built the same. If you grow corn in Iowa, you need a robot with tall clearance. If you grow lettuce in California, you need a lighter unit that does not compact the soil. Look for robots with adjustable wheel spacing and flotation tires.
-
Set up the field boundary and no-go zones. Most robot software lets you draw a field boundary on a satellite image. Mark areas with trees, irrigation risers, or standing water. The robot will avoid those zones automatically.
-
Calibrate the vision model for your crop. The robot ships with a general weed detection model. You will need to train it on your specific crop and weed species. Take 200 to 300 photos of your field. Label the weeds and the crop. Upload those images to the robot’s training interface. This step takes an afternoon but improves accuracy dramatically.
-
Run the initial mapping pass. Send the robot across the field at a speed of 2 to 3 miles per hour. It will scan every row. The robot creates a heat map showing weed density. You can view this map on your phone or tablet while the robot is still in the field.
-
Apply spot spraying based on the map. If your robot has a sprayer, it will apply herbicide automatically during the pass. If you use a separate sprayer, export the weed map as a shapefile. Load that file into your variable rate sprayer controller. The sprayer will only turn on nozzles where the map shows weeds.
-
Validate and repeat. After spraying, walk a few rows to check for misses. Adjust the robot’s detection sensitivity if needed. Run the robot again after 7 to 10 days to catch any new weeds that germinated.
Common Mistakes to Avoid
Even experienced agronomists make errors when first using these systems. Here are the most frequent ones.
| Mistake | Why It Happens | How to Fix It |
|---|---|---|
| Overlapping spray passes | The robot’s GPS drifts in areas with poor satellite reception. Wait for RTK fix before starting. | Use a base station or NTRIP correction service. |
| False positives from crop residue | Dead leaves and straw look like weeds to some cameras. | Adjust the color threshold in the vision settings. |
| Missing small weeds | The camera resolution is too low or the robot drives too fast. | Slow down to 1.5 mph and use a higher resolution camera. |
| Spray drift on windy days | Spot spraying uses small droplets that drift easily. | Set a wind speed limit in the robot’s software. |
| Battery running out mid field | The robot’s runtime is shorter than expected in heavy soil. | Plan routes that end near a charging station. |
Sensors and Tools That Make Weed Mapping Possible
The quality of your weed map depends on the sensors you use. Here are the main options.
-
RGB cameras. Standard color cameras work well for broadleaf weeds in row crops. They are affordable and provide good detail during daylight.
-
Multispectral cameras. These capture near-infrared and red-edge bands. They help distinguish between weed species that look similar to the naked eye. They also detect stress in the crop itself.
-
LiDAR sensors. LiDAR creates a 3D point cloud of the field. You can use it to measure weed height and biomass. This is useful for weeds like giant ragweed that grow taller than the crop.
-
Real-time kinematic GPS. Without RTK, your weed map could be off by several feet. That defeats the purpose of spot spraying. Always use RTK correction.
-
Soil moisture sensors. Some robots integrate soil moisture data. Wet soil can cause the robot to slip or get stuck. The robot can avoid those zones or adjust its speed.
For a deeper look at how sensors connect to the bigger picture, read about harnessing iot devices to transform modern farming practices.
Building a Weed Map That Your Sprayer Can Use
A weed map is only useful if your sprayer can read it. Most robots export maps in standard GIS formats like GeoJSON, Shapefile, or KML. Your sprayer’s controller needs to accept those formats. Check with your sprayer manufacturer before buying a robot.
The map should include three layers. The first layer is the field boundary. The second layer is the weed locations. The third layer is a confidence score for each weed. A confidence score of 90 percent or higher means the robot is very sure. You can set your sprayer to only treat weeds above a certain confidence threshold.
Integrating Weed Maps with Your Farm Management Software
You do not want to manage weed maps in isolation. They should flow into your existing farm management system. Most modern platforms accept API connections. The robot sends the map to the cloud. Your software pulls it down and merges it with yield data, soil maps, and planting records.
This integration lets you ask bigger questions. For example, do certain soil types have more weeds? Did a particular planter pass leave more gaps where weeds sprouted? Over time, you build a record of weed pressure across your farm. That data helps you make better decisions about crop rotation and tillage.
If you want to go deeper into using data to improve your operation, check out top strategies for using data analytics to maximize crop yields.
Expert Advice on Getting Started
“Start with one field that you know well. Do not try to deploy autonomous weed mapping robots across your whole farm in the first season. Pick a field that has moderate weed pressure and simple weed species. Learn the robot’s quirks there. Once you are comfortable, expand to more challenging fields.” — Dr. Maria Santos, precision agronomist at the University of Illinois
That advice holds true. The learning curve is real. You will have days when the robot loses GPS signal or the camera gets covered in dust. That is normal. Give yourself grace and time to troubleshoot.
How to Evaluate Robot Performance
After your first season, measure these metrics to decide if the robot is working for you.
-
Herbicide volume per acre. Compare the gallons used with the robot versus your previous broadcast rate. A 70 to 90 percent reduction is common.
-
Weed count after spraying. Walk transects across the field and count surviving weeds. Compare those counts to untreated check strips.
-
Time spent per acre. Record how long it takes to map and spray each acre. Include setup and charging time. Compare that to your old method.
-
Labor hours saved. Track how many hours you or your crew spent on weed scouting and spraying. Subtract the hours spent managing the robot.
-
Crop yield impact. At harvest, compare yield in areas that were spot sprayed versus areas that received broadcast treatment. You may see a small yield bump from reduced crop injury.
A Look at Autonomy Levels
Not all robots operate at the same level of independence. Here is a simple breakdown.
-
Level 1: Remote controlled. You drive the robot with a gamepad or tablet. It does not navigate on its own. This is good for small fields or research plots.
-
Level 2: Assisted autonomy. The robot follows a pre-planned path but stops if it encounters an obstacle. You still need to supervise it.
-
Level 3: Full autonomy. The robot plans its own route, avoids obstacles, and returns to charge. You only need to check the weed maps.
Most commercial robots in 2026 operate at Level 2. Level 3 systems exist but are more expensive. Start with Level 2 and upgrade as the technology matures.
What the 2026 Season Looks Like for Early Adopters
This year, more farmers in the Corn Belt and the Delta are running autonomous weed mapping robots. Equipment dealers are offering lease programs to lower the upfront cost. Some crop insurance companies are even offering discounts for farms that use precision spot spraying. The logic is simple: less herbicide means less environmental risk, which means lower liability for the insurer.
If you are still on the fence, consider this. The robots available in 2026 are more reliable than the models from two years ago. Battery life has improved. Camera resolution has doubled. The machine learning models are trained on larger datasets. The time to adopt is now, while the technology is good and before your neighbors lock up the best lease deals.
For a broader view of how technology is reshaping the farm, take a look at top digital tools transforming modern farming practices.
The Path Forward with Autonomous Weed Mapping
Autonomous weed mapping robots are not a distant future concept. They are rolling through soybean fields and vegetable beds right now. The technology works. The economics make sense. The only missing piece is your willingness to try it.
Start small. Pick a weedy field. Rent a robot for a week. Run a mapping pass. Look at the map. You will see patterns you never noticed before. That alone is worth the effort. Then take the next step and let the robot do the spraying. Your wallet and your crop will thank you.
